Software testing
in software development is the process of verifying and validating that a
software application works correctly, meets requirements, and is free (or has
minimal) defects.
In simple terms:
👉
Testing checks whether the software does what it is supposed to do—and also
ensures it doesn’t do what it shouldn’t do.
Why Testing is Important
Ø Ensures
quality and reliability
Ø Finds
bugs/defects before users do
Ø Improves
performance and security
Ø Builds
customer confidence
Ø Reduces cost of fixing issues later
Key Concepts
1. Verification vs Validation
Ø Verification
→ Are we building the product right?
(checking design, code, documents)
Ø Validation
→ Are we building the right product? (checking actual
functionality)
2. Defect / Bug
Ø Any
mismatch between expected result and actual result
Types of Testing (High-level)
Ø Functional
Testing → Checks features (login, payment, etc.)
Ø Non-Functional
Testing → Checks performance, security, usability
Ø Manual
Testing → Human executes test cases
Ø Automation
Testing → Tools/scripts execute tests
Simple Example
Imagine a login page:
Ø Enter
valid username/password → should log in ✅
Ø Enter
wrong password → should show error ❌
Ø Leave
fields empty → should validate ⚠️
Testing ensures all these
scenarios behave correctly.
👉 Software testing is
the process of ensuring a system is correct, complete, and reliable before it
reaches users.
SDLC vs STLC
|
Aspect |
SDLC (Software Development Life Cycle) |
STLC (Software Testing Life Cycle) |
|
Definition |
Process of developing software from requirement to
deployment |
Process of testing software to ensure quality |
|
Goal |
Build a high-quality product |
Ensure the product is defect-free |
|
Focus |
Development activities |
Testing activities |
|
Involvement |
Developers, Business Analysts, Architects, Testers |
Mainly Testers/QA team |
|
Phases |
Requirement → Design → Development →
Testing → Deployment → Maintenance |
Requirement Analysis → Test Planning → Test
Design → Test Execution → Defect Reporting → Test Closure |
|
Deliverables |
Code, design documents, builds |
Test cases, test reports, defect reports |
|
Nature |
Broad process |
Subset of SDLC |
|
Objective |
Build the product |
Validate and verify the product |
🐞 Defect vs Bug
|
Aspect |
Defect |
Bug |
|
Definition |
Deviation from expected result found by tester |
Issue found during testing or by developers |
|
Who Identifies |
Testers / QA team |
Developers (or sometimes testers) |
|
Stage |
Found during testing phase |
Found during development or testing |
|
Nature |
Indicates a failure in functionality |
Coding error or mistake |
|
Example |
Login fails even with correct credentials |
Wrong condition used in code (e.g., if(password
== null)) |
|
Usage |
Used in QA terminology |
Used more in development terminology |
|
Severity |
Can be categorized (Critical, High, Medium, Low) |
Same as defect but often informal term |
Simple Way to Remember
👉 SDLC = Building the
product
👉 STLC = Testing the
product
👉 Defect = Problem
identified by tester
👉 Bug = Coding mistake
causing the problem
Defect Life Cycle
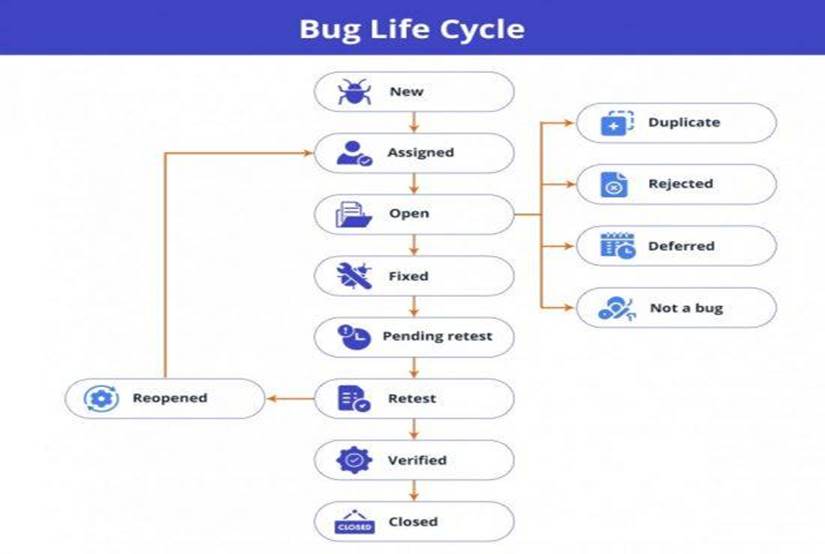
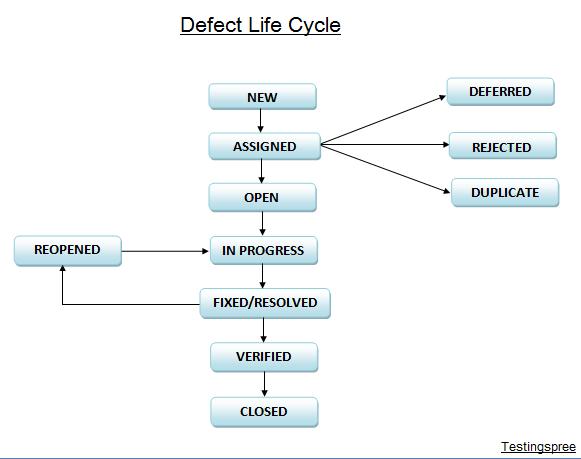
Defect Life Cycle – Stages
Explained
|
Status |
Description |
|
New |
Tester identifies a defect and logs it |
|
Assigned |
Defect is assigned to a developer |
|
Open |
Developer starts analyzing the
defect |
|
Fixed |
Developer fixes the issue and updates status |
|
Retest |
Tester verifies the fix |
|
Closed |
If working as expected, defect is closed |
|
Reopened |
If issue still exists, defect is reopened |
|
Rejected |
Developer says it is not a valid defect |
|
Deferred |
Fix is postponed to future release |
|
Duplicate |
Same defect already exists |
|
Not a Bug |
Expected behaviour (no issue) |
Simple Flow
New → Assigned → Open → Fixed →
Retest → Closed
👉 If failed during
retest:
➡ Reopened → Assigned → Fixed
→ Retest → Closed
Scenario: Login Issue
- Tester
logs defect → New
- Assigned
to developer → Assigned
- Developer
analyzes → Open
- Code
fixed → Fixed
- Tester
retests → Retest
- Works
fine → Closed ✅
If not working:
👉
Reopened ❌ → cycle repeats
1) Software Development Life
Cycle (SDLC)
SDLC is the end-to-end process of building software,
from idea to deployment and maintenance.
🔹 Phases
- Requirement
Gathering & Analysis
- Business
needs collected (BRD, FRD)
- Stakeholders
involved
- Output:
Clear requirements
- Feasibility
Study
- Technical,
financial, operational feasibility
- Example:
Can we scale using microservices?
- Design
- HLD
(High-Level Design): Architecture, components
- LLD
(Low-Level Design): Class diagrams, APIs
- Development
- Coding
phase
- Follows
coding standards, version control (Git)
- Testing
- QA
validates functionality
- Finds
defects before release
- Deployment
- Application
released to production
- CI/CD
pipelines used
- Maintenance
- Bug
fixes, enhancements
- Monitoring
(logs, alerts)
🔹 SDLC Models
- Waterfall
(sequential)
- Agile
(iterative)
- V-Model
(testing parallel to dev)
- DevOps
(continuous delivery)
2) Software Testing Life
Cycle (STLC)
STLC focuses only on testing activities.
🔹 Phases
- Requirement
Analysis
- Identify
testable requirements
- Prepare
RTM (Requirement Traceability Matrix)
- Test
Planning
- Define
scope, effort, tools, timelines
- Test
Case Design
- Write
test cases, test data preparation
- Test
Environment Setup
- Configure
servers, DB, tools
- Test
Execution
- Execute
test cases
- Log
defects
- Test
Closure
- Test
summary report
- Metrics
(pass %, defect density)
3) Testing Types
🔹 Functional Testing
Validates what system does
- Unit
Testing
- Integration
Testing
- System
Testing
- UAT
(User Acceptance Testing)
👉 Example:
- API
returns correct response
- Login works
Types of Testing (Simple +
Practical Table)
|
Testing Type |
What it Means (Simple) |
When Used |
Example |
|
Smoke Testing |
Basic check to see if build is stable |
After new build deployment |
App opens, login works |
|
Sanity Testing |
Quick check of specific functionality after fix |
After bug fix |
Fixed payment issue → test only payment |
|
Regression Testing |
Ensure old features still work after changes |
After code changes |
New feature added → verify login, cart |
|
Functional Testing |
Verify system works as per requirements |
During QA phase |
API returns correct response |
|
Non-Functional Testing |
Check performance, security, usability |
Before release |
App handles 10k users |
|
Unit Testing |
Test individual code components |
During development |
Test a Java method |
|
Integration Testing |
Test interaction between modules |
After unit testing |
Payment service ↔ Order service |
|
System Testing |
Test entire system end-to-end |
Before UAT |
Full order flow |
|
UAT (User Acceptance Testing) |
Validate with business users |
Before production |
Client validates payment flow |
|
Performance Testing |
Check speed, scalability |
Before release |
API response under load |
|
Load Testing |
Check behavior under expected
load |
During performance testing |
5k users accessing system |
|
Stress Testing |
Push system beyond limits |
During performance testing |
50k users → system crash point |
|
Security Testing |
Identify vulnerabilities |
Before release |
SQL injection check |
|
Usability Testing |
Check user-friendliness |
UI validation phase |
Easy navigation |
|
Compatibility Testing |
Works across devices/browsers |
Before release |
Chrome, Firefox testing |
|
Exploratory Testing |
Tester explores without scripts |
Anytime |
Random testing of app |
|
Ad-hoc Testing |
Informal random testing |
Quick checks |
Try unusual inputs |
|
End-to-End (E2E) Testing |
Test full workflow |
Before release |
Login → Cart → Payment |
|
API Testing |
Test backend APIs |
Backend validation |
POST /payment API |
|
Database Testing |
Validate DB operations |
Backend testing |
Data saved correctly |
|
Installation Testing |
Verify installation process |
Deployment phase |
App installs correctly |
|
Recovery Testing |
Check recovery after failure |
Reliability testing |
Restart after crash |
|
Alpha Testing |
Internal testing by team |
Before beta |
QA team testing |
|
Beta Testing |
Testing by real users |
Before final release |
Limited user rollout |
🔹 Non-Functional
Testing
Validates how system performs
- Performance
(Load, Stress)
- Security
- Usability
- Scalability
👉 Example:
- Can
system handle 10k users?
🔹 Regression
Testing
- Ensures
existing functionality is not broken
- Done
after code changes
👉 Example:
Fix payment bug → re-test login, cart, checkout
🔹 Smoke Testing
- Basic
sanity check of build
- Done
before detailed testing
👉 Example:
- App
launches
- Login
works
- APIs
respond
4) Test Case Design
Techniques
These improve coverage and efficiency.
🔹 1. Equivalence
Partitioning
- Divide
inputs into valid/invalid groups
👉 Example:
Age field (1–100)
- Valid:
1–100
- Invalid:
<1, >100
🔹 2. Boundary Value
Analysis
- Focus
on edges
👉 Example:
Test: 0, 1, 100, 101
🔹 3. Decision Table
Testing
- Based
on combinations of conditions
👉 Example:
If (User logged in + balance > 0) → allow payment
🔹 4. State Transition
Testing
- Based
on system states
👉 Example:
Login → Locked after 3 failed attempts
🔹 5. Use Case Testing
- Based
on user workflows
👉 Example:
Search → Add to cart → Checkout
5) Defect Lifecycle & Bug
Tracking
🔹 Defect Lifecycle
- New
- Assigned
- Open
- Fixed
- Retest
- Closed
- Reopened (if issue persists)
Severity vs Priority
|
Severity |
Priority |
|
Impact of bug |
Urgency to fix |
Example:
Ø Crash
→ High severity, High priority
Ø UI
issue → Low severity, Medium priority
Bug Tracking Tools
Ø JIRA
Ø Bugzilla
Ø Azure
DevOps
6) Agile Methodology &
Scrum
Agile = iterative and incremental development
🔹 Key Principles
Ø Continuous
delivery
Ø Customer
collaboration
Ø Responding
to change
🔹 Scrum Framework
Roles:
Ø Product
Owner → defines backlog
Ø Scrum
Master → removes blockers
Ø Team
→ developers + testers
Artifacts:
Ø Product
Backlog
Ø Sprint
Backlog
Ø Increment
Events:
Ø Sprint
Planning
Ø Daily
Standup
Ø Sprint
Review
Ø Retrospective
🔹 Sprint Cycle
Ø Usually
2–3 weeks
Ø Deliver working software each sprint
Agile Key Terms
|
Term |
Simple Meaning |
Who Uses It |
Example |
|
Agile |
Iterative way of developing software |
Entire team |
Deliver features in small cycles |
|
Scrum |
Agile framework with defined roles/events |
Team |
2-week sprint model |
|
Sprint |
Fixed time iteration (1–4 weeks) |
Team |
2-week development cycle |
|
Product Backlog |
List of all requirements/features |
Product Owner |
Payment feature, login feature |
|
Sprint Backlog |
Tasks selected for current sprint |
Team |
Implement payment API |
|
User Story |
Small requirement from user perspective |
Product Owner |
“As a user, I want to pay online” |
|
Epic |
Large feature broken into stories |
Product Owner |
Payment system |
|
Task |
Small unit of work |
Team |
Write API, write test cases |
|
Increment |
Working software delivered in sprint |
Team |
Payment feature working |
|
Definition of Done (DoD) |
Criteria to mark work complete |
Team |
Code + test + deployed |
|
Definition of Ready (DoR) |
Criteria before work starts |
Team |
Requirements clear, no blockers |
|
Sprint Planning |
Meeting to plan sprint work |
Team |
Select backlog items |
|
Daily Standup |
15-min daily sync meeting |
Team |
Progress + blockers |
|
Sprint Review |
Demo to stakeholders |
Team |
Show payment flow |
|
Sprint Retrospective |
Improve process discussion |
Team |
What went well/poor |
|
Product Owner (PO) |
Owns requirements/backlog |
Business side |
Prioritizes features |
|
Scrum Master (SM) |
Facilitates process, removes blockers |
Team support |
Resolves environment issues |
|
Development Team |
Builds product |
Dev + QA |
Coding + testing |
|
Velocity |
Work completed per sprint |
Team |
30 story points |
|
Story Points |
Effort estimation unit |
Team |
Login = 3 points |
|
Burndown Chart |
Tracks remaining work |
Team |
Work decreasing daily |
|
Backlog Grooming (Refinement) |
Update/prioritize backlog |
PO + Team |
Break epics into stories |
|
Spike |
Research task |
Team |
Explore payment gateway API |
|
Impediment |
Blocker affecting progress |
Team |
Server not available |
|
Release |
Deployment to production |
Team |
Version 1.0 release |
7) Test Plan & Test
Strategy
🔹 Test Plan
Detailed document describing:
Ø Scope
Ø Objectives
Ø Resources
Ø Schedule
Ø Risks
Ø Deliverables
👉 Created by: Test
Manager / Lead
🔹 Test Strategy
High-level approach:
Ø Testing
types
Ø Tools
Ø Automation
strategy
Ø Standards
👉 Often
organization-level document
Difference
|
Test Plan |
Test Strategy |
|
Project-specific |
Organization-level |
|
Detailed |
High-level |
|
Dynamic |
Stable |
🚀 Real-Time
Project Example: E-Commerce Payment System (Microservices + Spring Boot)
📌 Project Overview
You are working on an online shopping platform like Amazon.
Key Modules:
Ø User
Service (Login/Register)
Ø Product
Catalog
Ø Cart
Service
Ø Order
Service
Ø Payment
Service (critical)
Ø Notification
Service
🔁 1. SDLC Flow in Real Project
🔹 Requirement
Phase
Business requirement:
“User should be able to pay using UPI / Card / Wallet”
Artifacts:
Ø BRD,
FRD
Ø API
contracts (Swagger)
🔹 Design Phase
HLD:
Ø Microservices
architecture
Ø API
Gateway
Ø DB
per service
LLD:
- Payment
API design:
POST /payments/initiate
POST /payments/status
🔹 Development
Phase
Ø Spring
Boot services developed
Ø Integration
with payment gateway (e.g., PhonePe / Razorpay)
Ø Logging
added (Splunk integration)
🔹 Testing Phase (STLC starts here)
Now QA team enters 👇
🔄 2. STLC in This Project
🔹 Requirement Analysis
- Identify
testable scenarios:
Ø
Successful payment
Ø
Failed payment
Ø
Timeout case
🔹 Test Planning
- Scope:
Payment service only
- Tools:
Ø
API testing: Postman
Ø
Automation: RestAssured
Ø
Bug tracking: JIRA
🔹 Test Case Design
Example test case:
|
Test Case ID |
TC_PAY_001 |
|
Scenario |
Successful UPI payment |
|
Steps |
Initiate → Enter UPI → Success |
|
Expected |
Status = SUCCESS |
🔹
Test Execution
- Run
APIs
- Validate
DB entries
- Verify
logs
🔹 Test Closure
- Test
report
- Defect
summary
🧪 3. Testing Types in This Project
✅ Functional Testing
- Payment
success/failure
- Order
status updated
👉 Example:
If payment = SUCCESS → order = CONFIRMED
⚡ Non-Functional
Testing
Performance Testing
- Simulate
10,000 users paying at same time
Security Testing
- Validate
token/authentication
🔁 Regression Testing
- After
fixing payment bug:
- Re-test
cart
- Re-test
order flow
🔥 Smoke Testing
- Basic
checks:
- App
starts
- Payment
API responding
🧠 4. Test Case Design
Techniques Used
🔹 Boundary Value
- Payment
amount:
- Min:
₹1
- Max:
₹1,00,000
🔹 Equivalence
Partitioning
- Valid
cards vs invalid cards
🔹 State Transition
- Payment
states:
INITIATED → PENDING → SUCCESS / FAILED
🐞 5. Defect Lifecycle in Action
Example Bug:
Payment successful but order not created
Lifecycle:
- Tester
logs bug in JIRA
- Status
→ New → Assigned
- Dev
fixes issue
- Status
→ Fixed
- QA
retests
- Status
→ Closed
Severity vs Priority:
- Severity:
High (business impact)
- Priority:
High (urgent fix)
🔄 6. Agile + Scrum in This Project
🔹 Sprint Setup
Ø Sprint duration: 2 weeks
Roles
Ø Product
Owner
Ø Scrum
Master
Ø Development
Team
🔵 Artifacts
Ø Product
Backlog
Ø Sprint
Backlog
Ø Increment
🟠 Events
Ø Sprint
Planning
Ø Daily
Standup
Ø Sprint
Review
Ø Retrospective
🔹 Sprint Planning
Tasks:
- Develop
payment API
- Write
test cases
- Automation
scripts
🔹 Daily Standup
Each member answers:
- What
I did yesterday
- What
I’ll do today
- Blockers
🔹 Sprint Review
- Demo
payment flow to stakeholders
🔹 Retrospective
- What
went well
- What
can improve
📄 7. Test Plan & Strategy in This Project
🔹 Test Strategy (Org
Level)
- API-first
testing
- Automation-heavy
approach
- CI/CD
integration
🔹 Test Plan (Project
Level)
Includes:
- Scope:
Payment module
- Resources:
2 QA engineers
- Timeline:
2 weeks
- Risks:
- Third-party
gateway failure
🔗 End-to-End Flow (Very Important for Interview)
Here’s how everything connects:
- Requirement
comes → SDLC starts
- Design
+ Development done
- QA
enters → STLC starts
- Test
cases written using design techniques
- Testing
types applied (functional, regression, etc.)
- Bugs
tracked via JIRA
- Agile
ensures continuous delivery
- Test plan + strategy guide execution
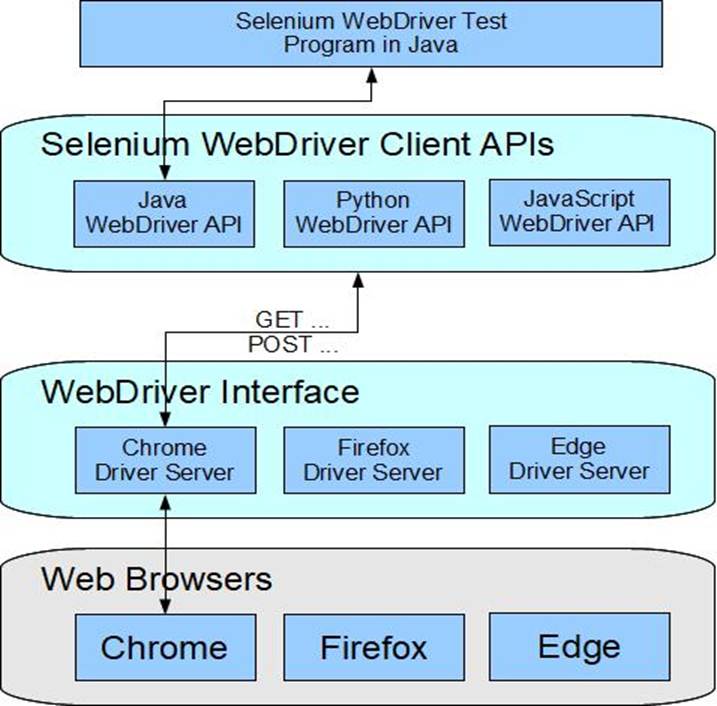
Selenium uses WebDriver architecture where test scripts communicate with browser drivers. We use locators like ID, XPath, and CSS to identify elements. WebDriver provides methods for interaction, while alerts, frames, and windows are handled using switchTo. Synchronization is managed using implicit and explicit waits. Advanced interactions use Actions class, and for maintainability, we follow Page Object Model design pattern.”
Selenium Architecture
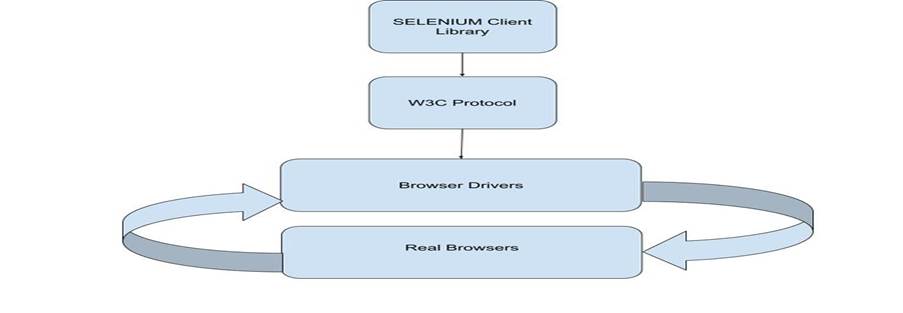
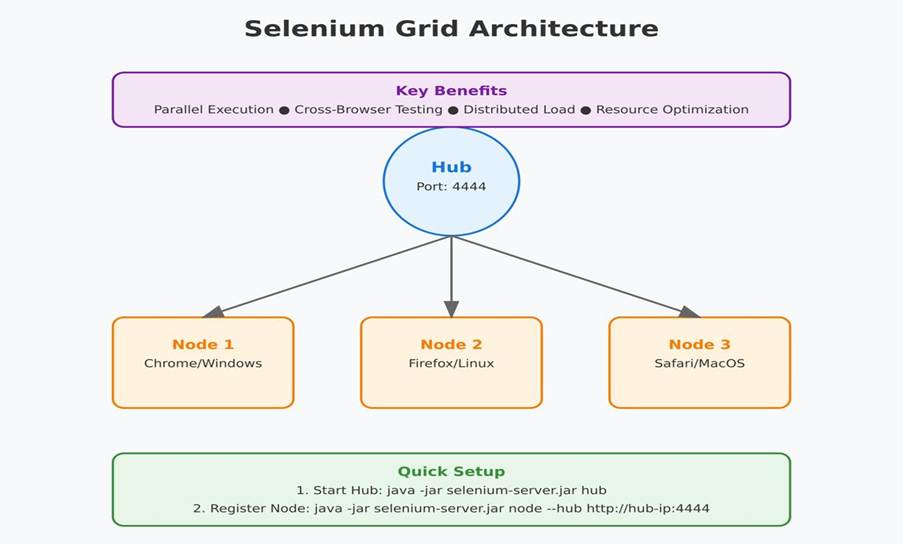
1.
How it works
(flow)
Ø
Test Script (Java + Selenium API)
Ø
Selenium WebDriver
Ø
Browser Driver (ChromeDriver,
GeckoDriver)
Ø
Real Browser (Chrome, Firefox)
👉 Flow:
Test Script → WebDriver → Browser Driver
→ Browser → Response back
Components
Ø Client
Libraries (Java, Python)
Ø WebDriver
API
Ø Browser
Drivers
Ø Selenium Grid (parallel execution)
👉 Example:
WebDriver driver = new ChromeDriver();
driver.get("https://example.com");
2.
Locators
(Very Important)
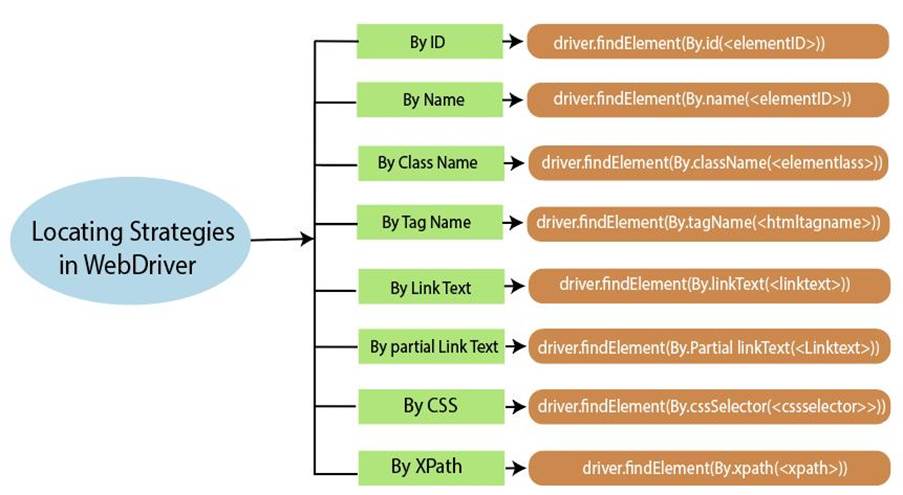
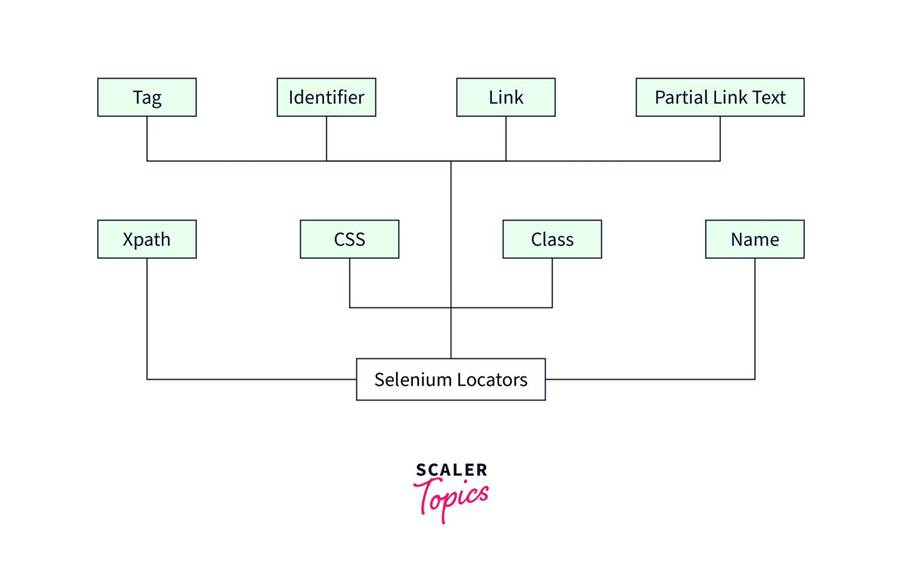
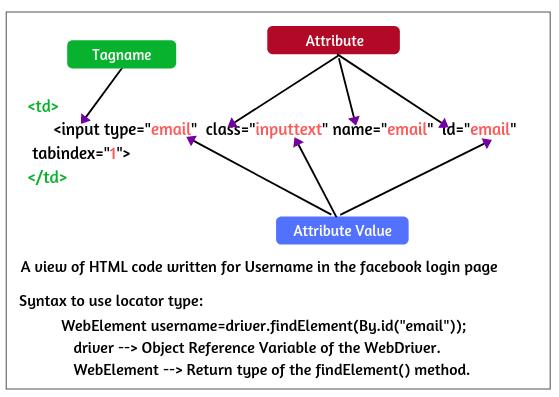
Types of Locators
|
Locator |
Usage |
Example |
|
ID |
Fastest & unique |
driver.findElement(By.id("username")) |
|
Name |
Based on name attribute |
By.name("email") |
|
XPath |
Flexible but slower |
//input[@type='text'] |
|
CSS Selector |
Faster than XPath |
input[type='text'] |
🔹 XPath Types
- Absolute:
/html/body/div[1]/input
- Relative: //input[@id='username']
CSS Examples
#username // by
id
.login-btn // by class
input[type='text']
3.
WebDriver Methods
Ø Browser Control
Ø driver.get("url");
driver.navigate().to("url");
driver.close();
driver.quit();
Ø 🔹 Element Actions
Ø driver.findElement(By.id("user")).sendKeys("test");
driver.findElement(By.id("btn")).click();
driver.findElement(By.id("msg")).getText();
Ø 🔹 Navigation
Ø driver.navigate().back();
driver.navigate().forward();
driver.navigate().refresh();
Ø 🔹 Manage Window
Ø driver.manage().window().maximize();
driver.manage().timeouts().implicitlyWait(Duration.ofSeconds(10));
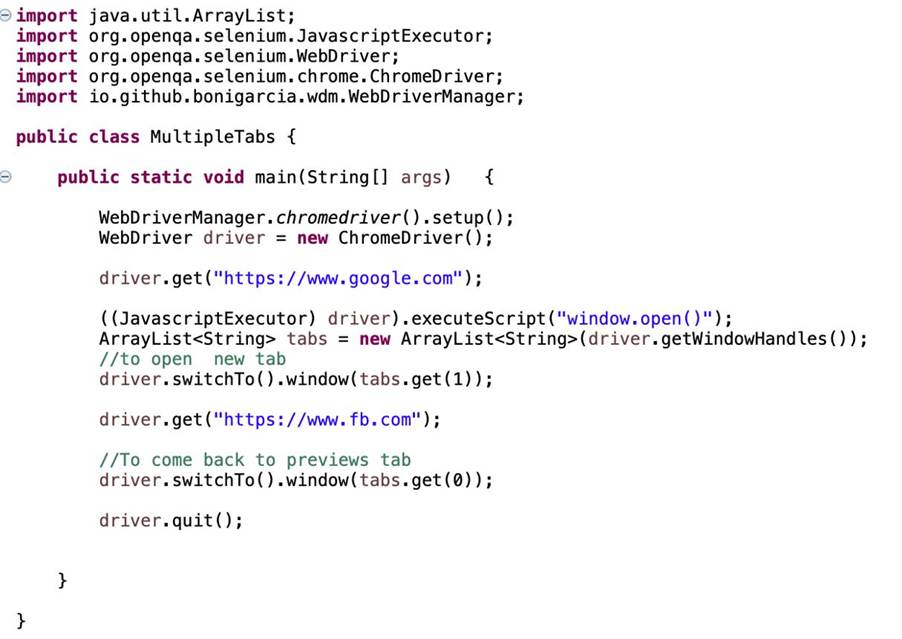
4) Handling Alerts, Frames, Windows
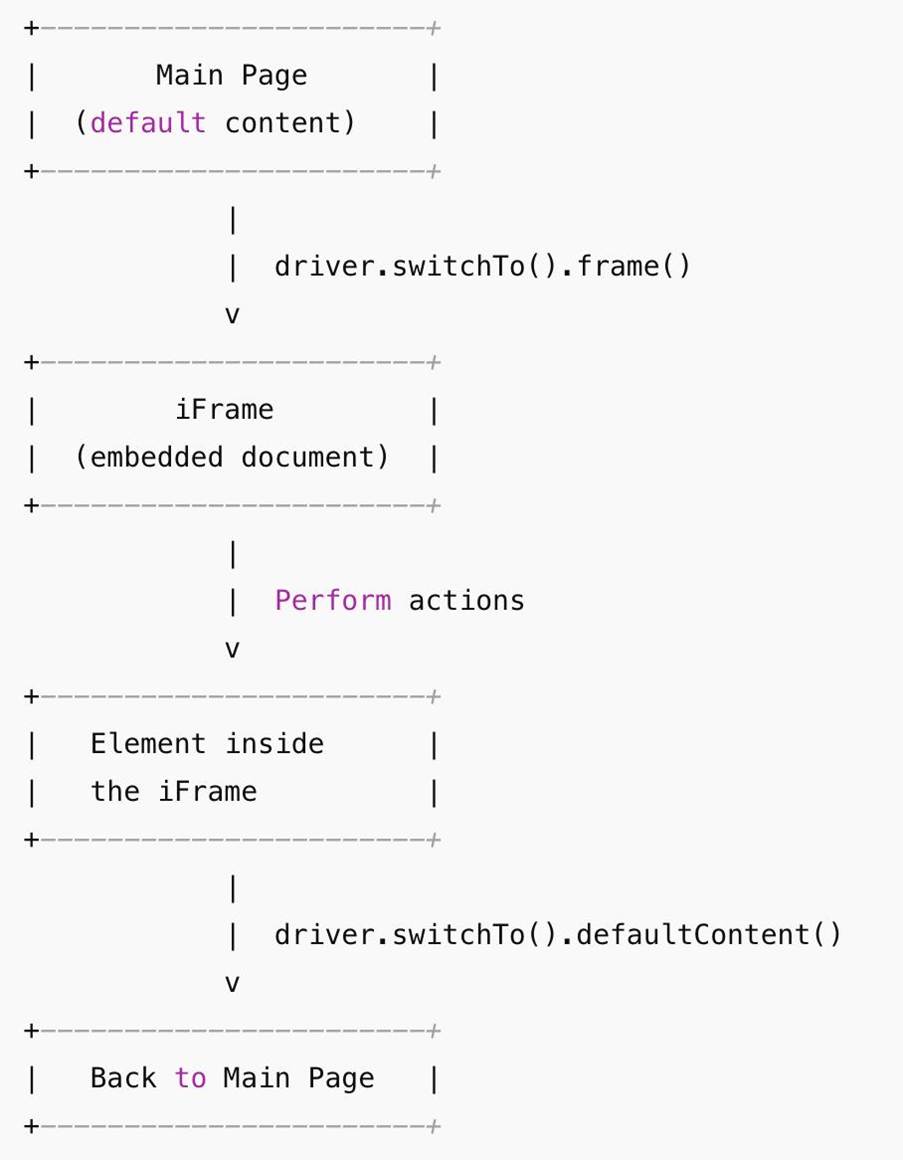
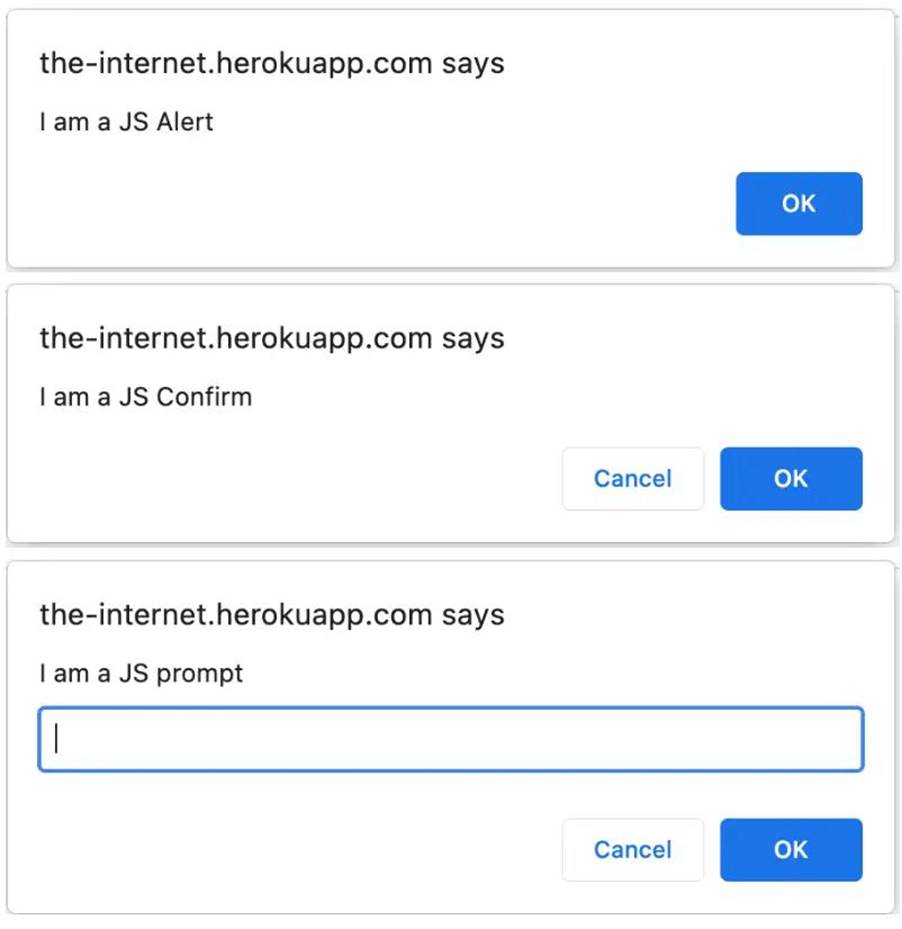
Difference
|
Implicit |
Explicit |
|
Global |
Specific |
|
Less control |
More control |
|
Not preferred |
Preferred |
6) Actions Class (Advanced User Interactions)
Used for mouse & keyboard actions
Actions actions = new Actions(driver);
// Hover
actions.moveToElement(element).perform();
// Drag and Drop
actions.dragAndDrop(src, dest).perform();
// Right Click
actions.contextClick(element).perform();
// Double Click
actions.doubleClick(element).perform();
🔹 Alerts
Alert alert = driver.switchTo().alert();
alert.accept(); // OK
alert.dismiss(); // Cancel
alert.getText();
🔹 Frames (iframe)
driver.switchTo().frame("frameName");
driver.switchTo().defaultContent();
🔹 Windows (Tabs)
String parent = driver.getWindowHandle();
for(String win : driver.getWindowHandles()){
driver.switchTo().window(win);
}
⏳ 5)
Waits (Critical for interviews)
🔹 Implicit Wait
- Global
wait
driver.manage().timeouts().implicitlyWait(Duration.ofSeconds(10));
🔹 Explicit Wait (Recommended)
WebDriverWait wait = new WebDriverWait(driver,
Duration.ofSeconds(10));
wait.until(ExpectedConditions.visibilityOfElementLocated(By.id("login")));
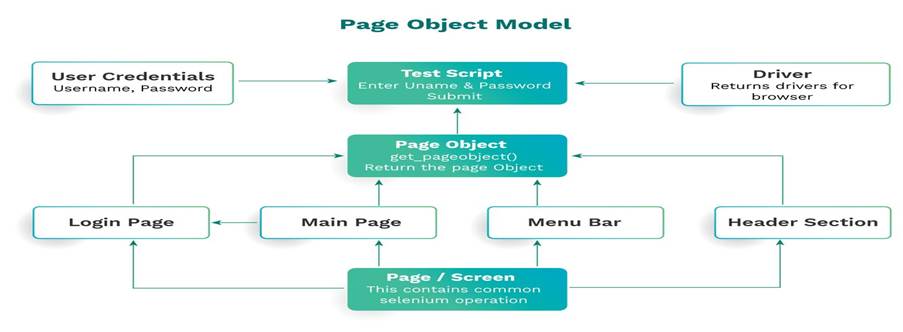
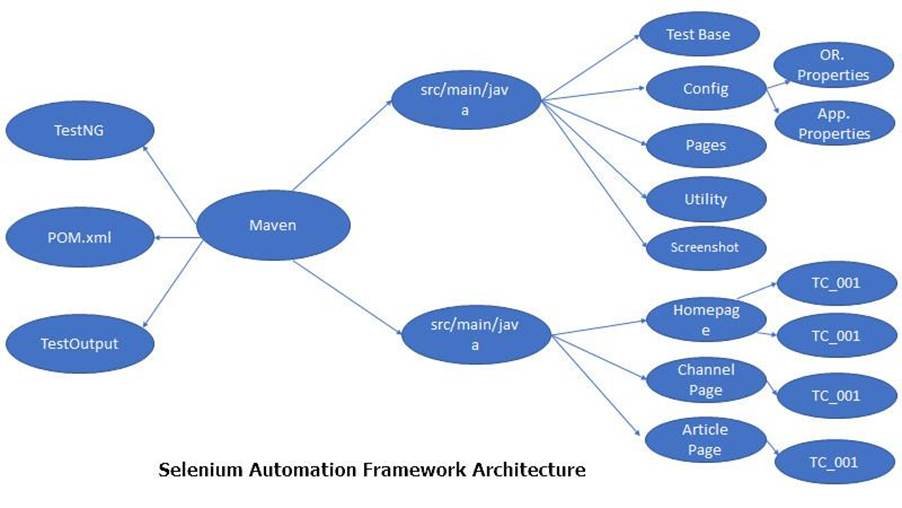
7) Page Object Model (POM) –
VERY IMPORTANT
6
🔹 What is POM?
Design pattern where:
- Each
page = one class
- Elements
+ methods separated from test logic
🔹 Without POM
- Repeated
code
- Hard
to maintain
🔹 With POM
- Clean
code
- Reusable
- Easy
maintenance
🔹 Example
🔹 LoginPage.java
public class LoginPage {
WebDriver driver;
By username = By.id("user");
By password = By.id("pass");
By loginBtn
= By.id("login");
public LoginPage(WebDriver
driver){
this.driver = driver;
}
public void enterUsername(String
user){
driver.findElement(username).sendKeys(user);
}
public void enterPassword(String
pass){
driver.findElement(password).sendKeys(pass);
}
public void clickLogin(){
driver.findElement(loginBtn).click();
}
}
🔹 Test Class
LoginPage lp
= new LoginPage(driver);
lp.enterUsername("admin");
lp.enterPassword("123");
lp.clickLogin();
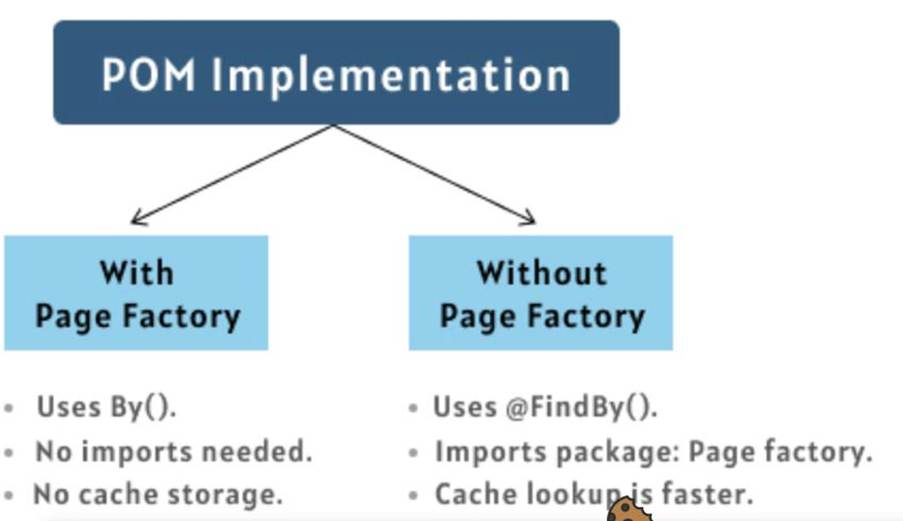
🔹 PageFactory (Advanced POM)
@FindBy(id="user")
WebElement username;
PageFactory.initElements(driver, this);
🔹
Advantages
- Reusability
- Maintainability
- Readability
- Separation
of concerns
TestNG Setup &
Annotations
What is TestNG?
TestNG is a testing framework for Java inspired by
JUnit, designed for:
Ø Better
test configuration
Ø Parallel
execution
Ø Data-driven
testing
Ø Reporting
Setup (Basic Steps)
Ø Add dependency (Maven):
<dependency>
<groupId>org.testng</groupId>
<artifactId>testng</artifactId>
<version>7.8.0</version>
<scope>test</scope>
</dependency>
Ø Install
TestNG plugin (IDE)
Ø Create
test class
Ø Run as TestNG test
Important Annotations
|
Annotation |
Purpose |
|
@Test |
Marks test method |
|
@BeforeSuite |
Runs before entire suite |
|
@AfterSuite |
Runs after suite |
|
@BeforeClass |
Before class execution |
|
@AfterClass |
After class execution |
|
@BeforeMethod |
Before each test |
|
@AfterMethod |
After each test |
|
@BeforeTest |
Before <test> tag |
|
@AfterTest |
After <test> tag |
Example
public class SampleTest {
@BeforeMethod
public void setup(){
System.out.println("Setup");
}
@Test
public void test1(){
System.out.println("Test 1");
}
@AfterMethod
public void teardown(){
System.out.println("Teardown");
}
}
2) Test Execution & Prioritization
Priority
Controls execution order
@Test(priority = 1)
public void login(){}
@Test(priority = 2)
public void addToCart(){}
👉 Lower number →
executes first
🔹 Default Behavior
- If
no priority → alphabetical order
🔹 DependsOnMethods
@Test
public void login(){}
@Test(dependsOnMethods = "login")
public void checkout(){}
👉 checkout runs only if login
passes
🔹 Groups
@Test(groups = "smoke")
public void login(){}
Run specific group via XML
3) Data Providers (Data-Driven Testing)
Run same test with multiple data sets
🔹 Example
@DataProvider(name="loginData")
public Object[][] getData(){
return new Object[][]{
{"user1","pass1"},
{"user2","pass2"}
};
}
@Test(dataProvider="loginData")
public void loginTest(String user, String pass){
System.out.println(user
+ " " + pass);
}
👉 Test runs twice with
different inputs
🔹 Real Use Case
- Multiple
users
- Multiple
API inputs
- Boundary
testing
✅ 4) Assertions
Used to validate expected vs actual
🔹 Types
1. Hard Assertion
Stops execution if fails
Assert.assertEquals(actual, expected);
2. Soft Assertion
Continues execution
SoftAssert soft = new SoftAssert();
soft.assertEquals(actual, expected);
soft.assertAll(); //
mandatory
Common Assertions
|
Method |
Purpose |
|
Method |
Purpose |
|
|
Compare values |
|
|
Check condition |
|
|
Validate false |
|
|
Check null |
5) TestNG Reports
🔹 Default Reports
Generated
After execution:
index.html
emailable-report.html
🔹 What they contain:
Passed / Failed tests
Execution time
Logs
🔹 Custom Reports
(Advanced)
Extent Reports (most used)
Allure Reports
🔹 Example tools:
ExtentReports
Allure Report
⚡ 6) Parallel Execution
(Very Important)
🔹 Why?
Reduce execution time
Run tests simultaneously
🔹 Types of Parallel
Execution
Type Meaning
methods Run
test methods in parallel
classes Run
classes in parallel
tests Run
<test> tags in parallel
🔹 Example (testng.xml)
<suite name="Suite"
parallel="methods" thread-count="3">
<test
name="Test1">
<classes>
<class
name="TestClass"/>
</classes>
</test>
</suite>
🔹 Key Points
Thread-safe code required
Use separate WebDriver instances
🔥 Real-Time Usage
(Important)
In Selenium projects:
TestNG used for test execution
DataProvider → for multiple
test data
Assertions → for validation
Reports → for result tracking
Parallel execution → for faster CI/CD
TestNG is a powerful Java testing framework that supports annotations, data-driven testing, and parallel execution. We use annotations like @Test and @BeforeMethod for lifecycle management. Test execution can be controlled using priority and dependencies. DataProviders enable running tests with multiple datasets. Assertions validate results, and TestNG generates detailed reports. Parallel execution helps reduce execution time, especially in Selenium automation frameworks
Cucumber
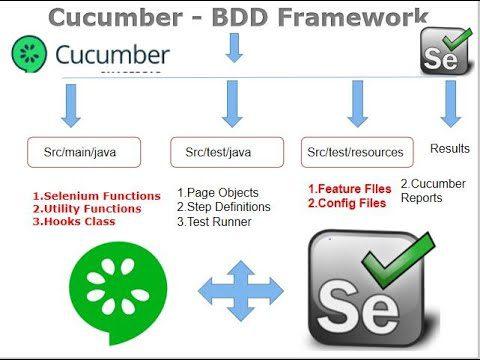
Cucumber is a Behavior Driven Development (BDD) tool that lets you write tests in plain English (Gherkin) so business + QA + dev can collaborate.
Cucumber is a BDD framework that uses Gherkin syntax to write test scenarios in plain English. Feature files define behavior using Given-When-Then, and step definitions map them to Java code. Hooks manage setup and teardown. It integrates with Selenium for UI automation and TestNG for execution and reporting. Cucumber reports provide detailed insights into test execution.
1) 🧠 BDD Concepts (Behavior Driven Development)
🔹 What is BDD?
Behavior Driven Development
focuses on:
- Behavior of application
- Collaboration
between stakeholders
- Writing
tests in human-readable format
🔹 Core Idea
Instead of writing technical test cases:
👉
Write behavior scenarios
Example:
User logs in → sees dashboard
🔹 BDD Flow (Real Project)
- Business
writes requirement
- QA
writes feature file (Given-When-Then)
- Dev
implements step definitions
- Automation
executes scenarios
🔹 Advantages
- Easy
to understand (non-technical)
- Living
documentation
- Improves
collaboration
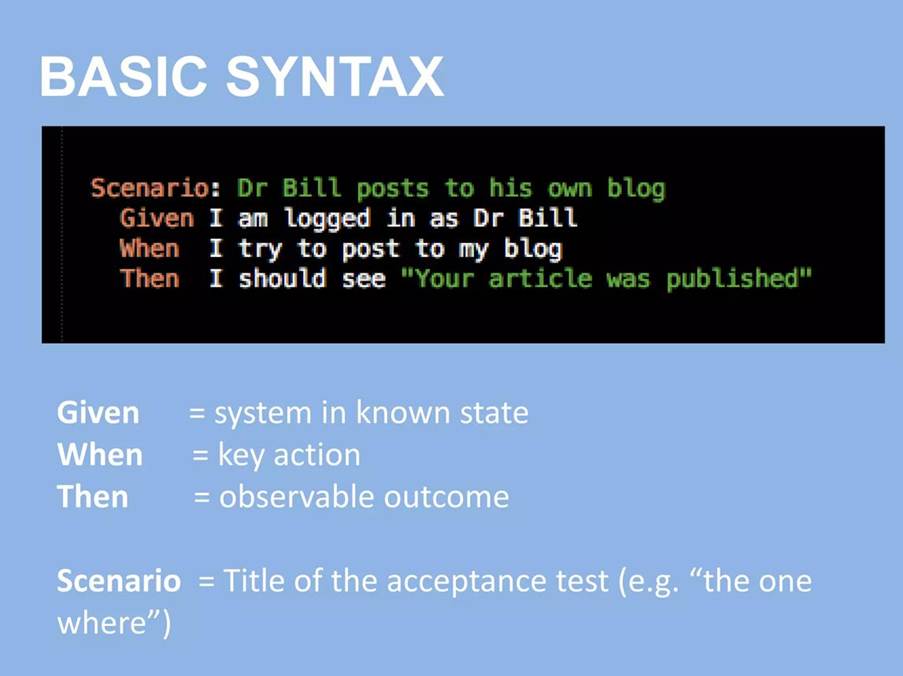
2) 📄 Feature Files & Gherkin Syntax
7
🔹 What is a Feature File?
- Written
in .feature file
- Uses
Gherkin language
🔹 Gherkin Keywords
|
Keyword |
Meaning |
|
Feature |
High-level functionality |
|
Scenario |
Test case |
|
Given |
Precondition |
|
When |
Action |
|
Then |
Expected result |
|
And |
Additional steps |
🔹 Example
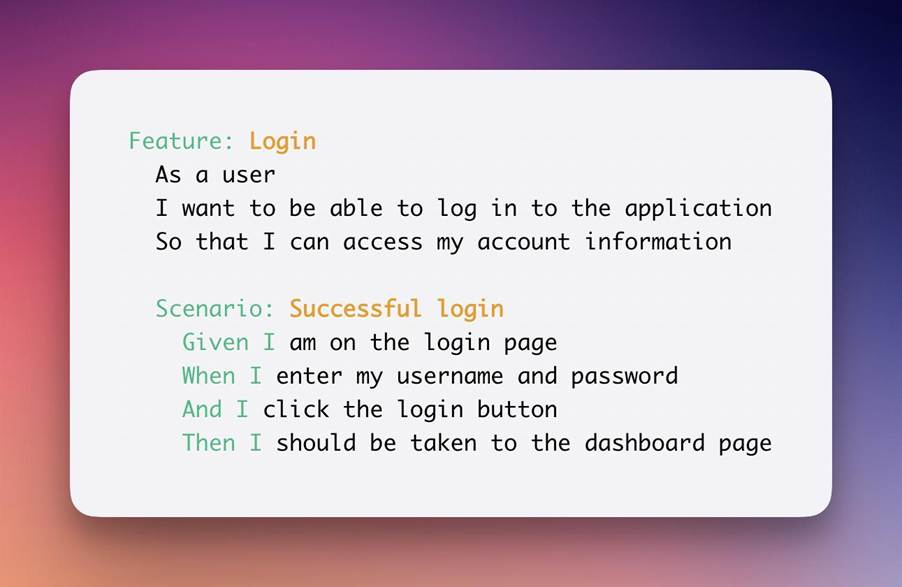
Feature: Login Functionality
Scenario: Successful Login
Given user is on login page
When user enters username and
password
And clicks login button
Then user should see dashboard
🔹 Best Practices
- Keep
scenarios simple
- One
scenario = one behavior
- Avoid
technical details
3) 🔧 Step Definitions
🔹 What are Step
Definitions?
- Java
methods mapped to Gherkin steps
🔹 Example
Feature Step:
Given user is on login page
Step Definition:
@Given("user is on login
page")
public void openLoginPage() {
driver.get("https://example.com/login");
}
🔹 Parameterization
Example
When user enters "admin" and "123"
@When("user enters {string}
and {string}")
public void enterCredentials(String user, String pass) {
// use values
}
🔹 Key Point
👉 Feature file = readable
👉
Step definition = executable
4) 🔁 Hooks (Before & After)
🔹 What are Hooks?
- Run
before/after scenarios
🔹 Types
|
Hook |
Purpose |
|
@Before |
Setup (launch browser) |
|
@After |
Cleanup (close browser) |
🔹 Example
@Before
public void setup() {
driver = new ChromeDriver();
}
@After
public void teardown() {
driver.quit();
}
🔹 Tagged Hooks
@Before("@smoke")
public void setupSmoke() {
// only for smoke tests
}
5) 🔗 Integration with Selenium & TestNG
🔹 How it works together
- Cucumber
→ BDD layer
- Selenium
→ UI automation
- TestNG
→ execution + reporting
🔹
Flow
Feature File → Step Definitions → Selenium
WebDriver → Browser
↓
TestNG Runner
🔹 TestNG Runner Example
@CucumberOptions(
features = "src/test/resources/features",
glue = "stepdefinitions",
plugin = {"pretty", "html:target/cucumber-report.html"}
)
public class TestRunner extends AbstractTestNGCucumberTests
{
}
🔹 Dependencies (Maven)
<dependency>
<groupId>io.cucumber</groupId>
<artifactId>cucumber-java</artifactId>
</dependency>
<dependency>
<groupId>io.cucumber</groupId>
<artifactId>cucumber-testng</artifactId>
</dependency>
🔹 Real-Time Example
- Feature
→ Login.feature
- StepDef → LoginSteps.java
- Runner
→ TestRunner.java
- Selenium
→ handles UI actions
6) 📊 Cucumber Reports
🔹 Default Reports
- HTML
report
- Console
output
🔹 Plugins
plugin = {
"pretty",
"html:target/report.html",
"json:target/report.json"
}
🔹 Advanced Reporting Tools
- Allure
Report
- ExtentReports
🔹 What Reports Show
- Passed
/ Failed scenarios
- Step
execution
- Screenshots
(if added)
- Execution
time
🔥 Real-Time Project Structure
src/test/java
├── stepdefinitions/
├── runners/
├── hooks/
src/test/resources
├── features/
JUnit
What is JUnit?
JUnit is a widely used Java testing framework primarily for unit testing. It provides annotations like @Test, @BeforeEach, and @AfterEach to manage test lifecycle. Assertions are used for validation, and parameterized tests allow running tests with multiple inputs. JUnit integrates well with build tools and CI/CD pipelines, making it a standard choice for backend testing
JUnit is a popular Java testing framework used to:
Ø Write
and run unit tests
Ø Validate
application logic
Ø Integrate
with build tools (Maven/Gradle) and CI/CD
👉 Mostly used for:
Ø Unit
testing
Ø API
testing
Ø Backend
validation
JUnit Key Concepts
|
Concept |
Simple Meaning |
Example / Use |
|
Test Case |
A single test method |
testLogin() |
|
Test Suite |
Group of test classes |
Run multiple classes together |
|
Assertions |
Validate expected vs actual |
assertEquals() |
|
Test Runner |
Executes test cases |
JUnit engine |
|
Fixture |
Setup/teardown data |
DB connection setup |
|
Annotations |
Control execution flow |
@Test, @BeforeEach |
|
Parameterized Tests |
Run test with multiple data |
Multiple inputs |
|
Test Lifecycle |
Order of execution |
Setup → Test → Cleanup |
|
Mocking |
Simulate dependencies |
Use Mockito |
|
Exception Testing |
Validate error scenarios |
Expect exception |
JUnit Key Annotations
Lifecycle Annotations
|
Annotation |
When it Runs |
Purpose |
|
@BeforeAll |
Once before all tests |
Global setup |
|
@AfterAll |
Once after all tests |
Global cleanup |
|
@BeforeEach |
Before each test |
Setup |
|
@AfterEach |
After each test |
Cleanup |
Test Execution Annotations
|
Annotation |
Purpose |
Example |
|
@Test |
Marks test method |
@Test public void testLogin() |
|
@Disabled |
Skip test |
Temporarily disable |
|
@DisplayName |
Custom test name |
"Login Test" |
|
@RepeatedTest |
Repeat test multiple times |
Run 5 times |
🔹 Parameterized Testing
|
Annotation |
Purpose |
Example |
|
@ParameterizedTest |
Run test with multiple inputs |
Multiple data sets |
|
@ValueSource |
Pass simple values |
{1,2,3} |
|
@CsvSource |
Multiple values |
"user,pass" |
🔹 Assertion Methods
|
Assertion |
Purpose |
|
assertEquals() |
Compare values |
|
assertTrue() |
Validate true condition |
|
assertFalse() |
Validate false |
|
assertNull() |
Check null |
|
assertNotNull() |
Check not null |
|
assertThrows() |
Validate exception |
⚙️ 3) JUnit Example (End-to-End)
import org.junit.jupiter.api.*;
public class LoginTest {
@BeforeAll
static void setupAll()
{
System.out.println("Before
All Tests");
}
@BeforeEach
void setup() {
System.out.println("Before
Each Test");
}
@Test
void testLoginSuccess()
{
String actual = "success";
Assertions.assertEquals("success",
actual);
}
@Test
void testException()
{
Assertions.assertThrows(Exception.class, () -> {
throw new Exception("Error");
});
}
@AfterEach
void teardown() {
System.out.println("After
Each Test");
}
@AfterAll
static void teardownAll()
{
System.out.println("After
All Tests");
}
}
🔄 4) Test Lifecycle (Very Important)
Execution Flow:
@BeforeAll
↓
@BeforeEach
↓
@Test
↓
@AfterEach
↓
(Repeat for all tests)
↓
@AfterAll
📊 5) JUnit vs TestNG (Interview Favorite)
|
Feature |
JUnit |
TestNG |
|
Complexity |
Simple |
Advanced |
|
Annotations |
Limited |
Rich |
|
Parallel Execution |
Limited |
Strong |
|
Data Provider |
Limited |
Powerful |
|
Dependency Handling |
No |
Yes |
|
Reporting |
Basic |
Advanced |
🔥 6) Real-Time Usage
In real projects:
- JUnit
→ Unit testing (service layer)
- Selenium
→ UI automation
- TestNG/Cucumber
→ Advanced frameworks
JMeter
Apache JMeter is an open-source performance testing tool used
to:
Ø Test
load, stress, and performance
Ø Simulate
multiple users hitting APIs/web apps
Ø Measure response time, throughput, error rate
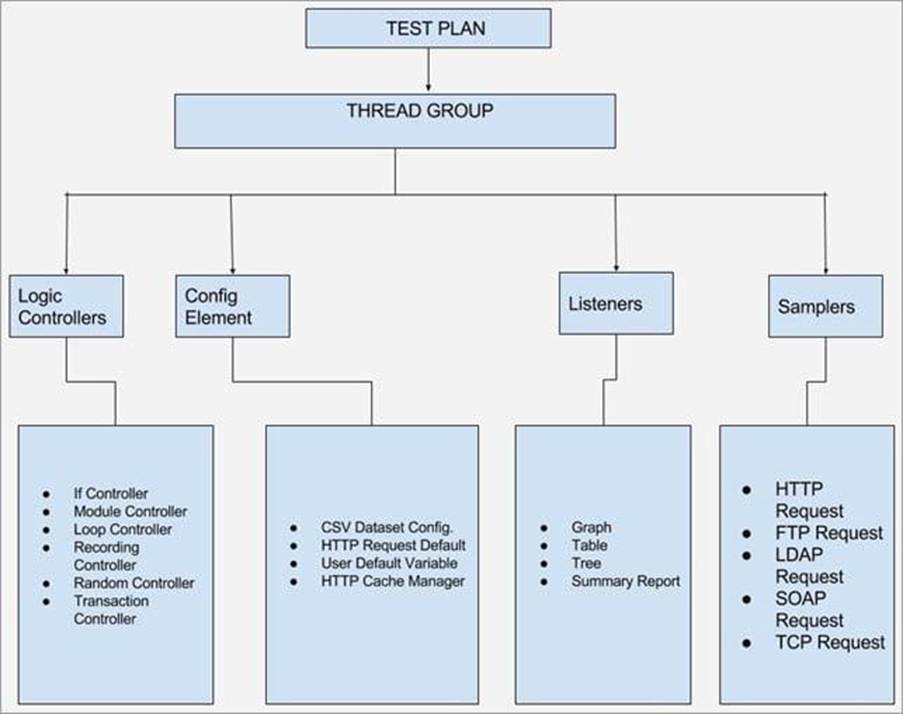
JMeter is an open-source performance testing tool used
to simulate multiple users and measure system performance. It works using
thread groups to generate load, samplers to send requests, and listeners to
capture results. In our Spring Boot project, we used JMeter to test APIs by
configuring HTTP samplers, adding assertions for validation, and analysing
metrics like response time and throughput. We also used CSV data for
parameterization and timers to simulate real user behaviour
👉 Common use cases:
Ø API
load testing
Ø Microservices
performance validation
Ø Database
stress testing
Key Concepts
|
Concept |
Meaning |
Example |
|
Thread (User) |
Virtual user |
100 users hitting API |
|
Thread Group |
Collection of users |
100 users group |
|
Sampler |
Request sent |
HTTP request |
|
Listener |
Shows results |
Graph, table |
|
Assertion |
Validation |
Response = 200 |
|
Timer |
Delay between requests |
1 sec delay |
|
Throughput |
Requests/sec |
500 req/sec |
|
Ramp-Up Period |
Time to start users |
100 users in 10 sec |
|
Loop Count |
Repetition count |
Run 5 times |
How JMeter Works (Flow)
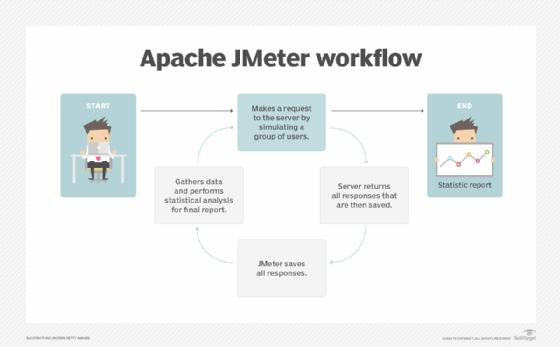
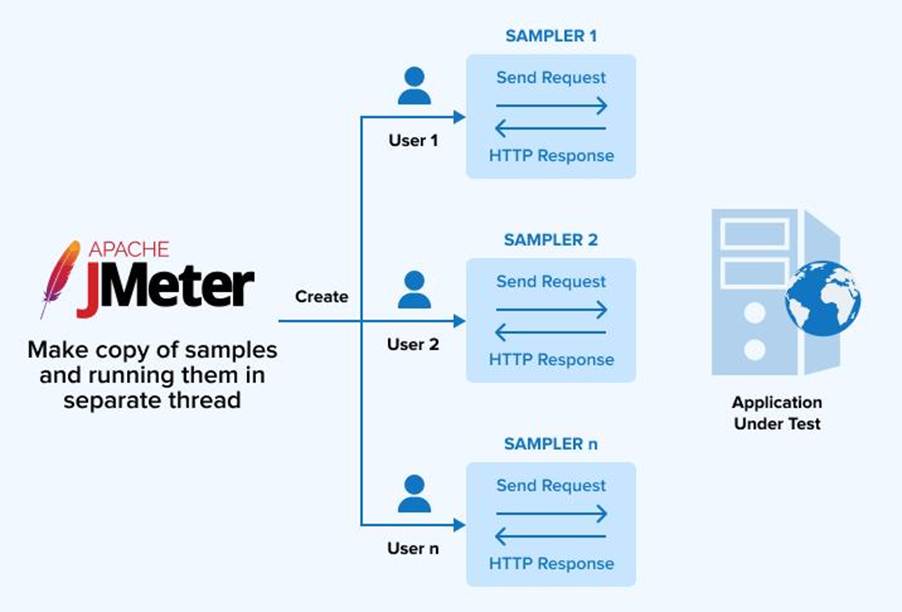
Flow:
Thread Group → Sampler (API call) → Server
→ Response → Listener (Results)
JMeter Setup (Step-by-Step)
1. Install JMeter
Ø Download
from official site
Ø Extract
zip
Ø Run:
jmeter.bat (Windows)
jmeter.sh (Linux/Mac)
🔹 2. Create Test Plan
Step 1: Add Thread Group
Right click → Add → Threads → Thread Group
Set:
- Number
of Threads (Users): 100
- Ramp-Up:
10 sec
- Loop
Count: 5
Step 2: Add HTTP Request
(Sampler)
Right click → Add → Sampler → HTTP Request
Example:
- Method:
POST
- URL:
http://localhost:8080/api/payment
Step 3: Add Listener
Right click → Add → Listener → View
Results Tree / Summary Report
🔗 JMeter with Spring Boot Application
🔹 Sample Spring Boot API
@RestController
@RequestMapping("/api")
public class PaymentController {
@GetMapping("/test")
public String testAPI() {
return "Success";
}
}
🔹 Test This API in JMeter
Configuration:
|
Field |
Value |
|
Protocol |
http |
|
Server Name |
localhost |
|
Port |
8080 |
|
Path |
/api/test |
|
Method |
GET |
🔹 Run Test
Ø
Click ▶ (Start)
Ø
Observe results in listener
📊 Key Metrics to Analyze
|
Metric |
Meaning |
|
Response Time |
Time taken per request |
|
Throughput |
Requests per second |
|
Error % |
Failure rate |
|
Latency |
Delay before response |
⚡ Real-Time Scenario (Important)
👉 Example:
Ø Payment
API should handle 5000 users
Ø SLA:
Response time < 2 sec
Test Plan:
Ø Threads:
5000
Ø Ramp-up:
100 sec
Ø Assertions:
Response Code = 200
Response Time < 2000ms
🔍 Advanced Configuration
🔹 1. Assertions
Validate response:
- Status
code = 200
- Response
contains "Success"
🔹 2. Timers
Simulate real users:
- Constant
Timer (1–2 sec delay)
🔹 3. CSV Data Set Config
Data-driven testing:
user1,pass1
user2,pass2
🔹 4. Header Manager
For APIs:
Content-Type: application/json
Authorization: Bearer token
🔹 5. Distributed Testing
- Master
+ Slave setup
- Used
for high load (10k+ users)
🔥 Common Issues in Real Projects
Ø CPU
bottleneck on local machine
Ø DB
connection limits
Ø Thread
starvation in Spring Boot
Ø Improper
connection pooling
🧪 JMeter vs Other Tools
|
Tool |
Usage |
|
JMeter |
Open-source, flexible |
|
LoadRunner |
Enterprise tool |
|
Gatling |
Code-based testing |
Playwright
Playwright is a modern end-to-end testing framework
developed by Microsoft for:
Ø UI
automation (web apps)
Ø API
testing
Ø Cross-browser testing
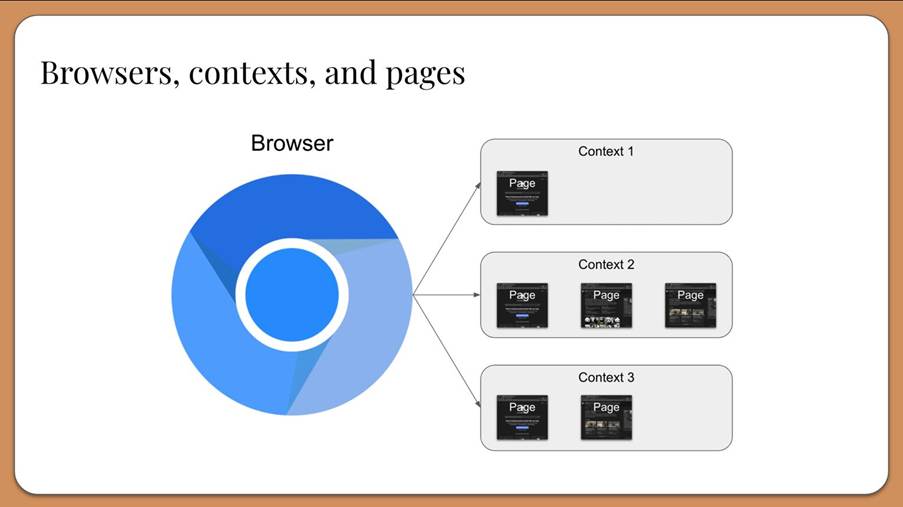
Playwright is a modern browser
automation framework by Microsoft that supports cross-browser testing with
built-in auto-waiting, parallel execution, and advanced debugging features. It
uses concepts like browser, context, and page to manage sessions efficiently.
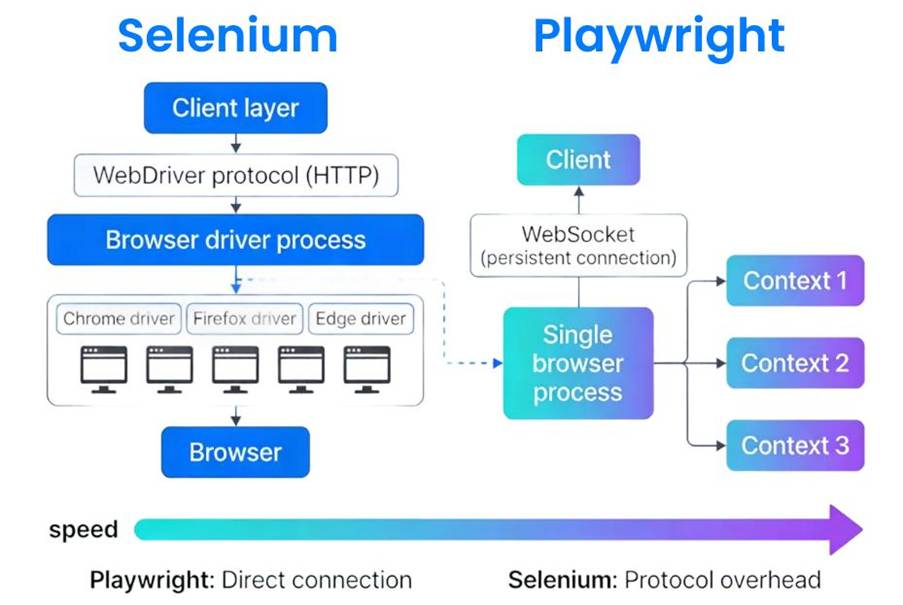
Compared to Selenium, Playwright is faster and more stable due to its auto-wait
mechanism and native browser control
👉 Supports:
Ø Chromium
(Chrome/Edge)
Ø Firefox
Ø WebKit (Safari)
Key Concepts
|
Concept |
Meaning |
Example |
|
Browser |
Actual browser instance |
Chromium |
|
Context |
Isolated session (like incognito) |
Multiple users |
|
Page |
Single tab |
Login page |
|
Locator |
Element selector |
page.locator("#username") |
|
Auto-Wait |
Waits automatically |
No need for explicit waits |
|
Fixtures |
Setup/teardown |
Browser setup |
|
Tracing |
Debugging tool |
Record execution |
|
Headless Mode |
Run without UI |
CI/CD execution |
Playwright Architecture
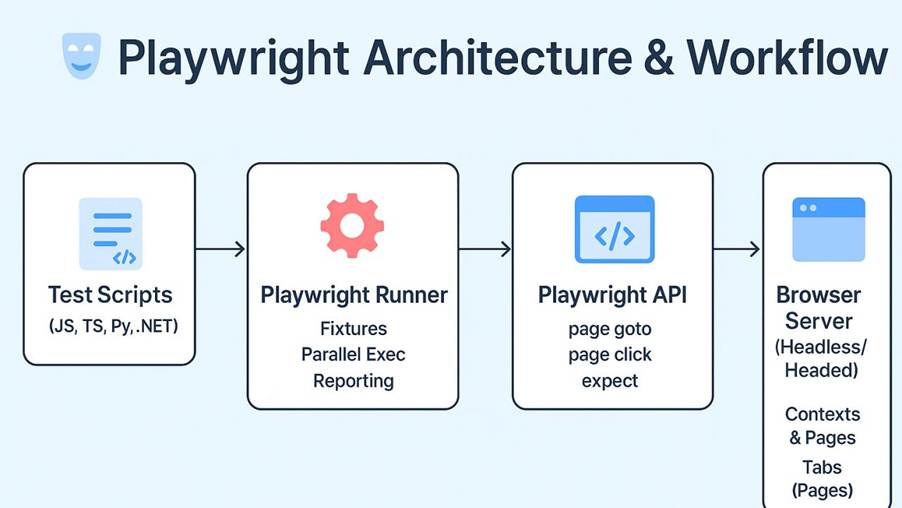
Flow
Test Script → Playwright API → Browser Engine → Browser → Response
🔹 Key Components
Ø
Playwright Client (Java/Node/Python)
Ø
Browser Engine (Chromium/WebKit/Firefox)
Ø
Browser Context (isolated sessions)
Ø Pages (tabs)
Locators in Playwright
|
Locator |
Example |
|
By ID |
page.locator("#username") |
|
By Text |
page.getByText("Login") |
|
By Role |
page.getByRole("button",
new Page.GetByRoleOptions().setName("Login")) |
|
CSS |
page.locator("input[type='text']") |
|
XPath |
page.locator("//input[@id='user']") |
Example
page.locator("#username").fill("admin");
page.getByText("Login").click();
Playwright prefers:
Ø
Role
Ø
Text
Ø TestId (stable locators)
Playwright Methods (Core
Actions)
Navigation
page.navigate("https://example.com");
Element Actions
page.locator("#user").fill("admin");
page.locator("#btn").click();
page.locator("#msg").textContent();
Keyboard & Mouse
page.keyboard().type("hello");
page.mouse().click(100, 200);
Screenshots
page.screenshot(new Page.ScreenshotOptions().setPath(Paths.get("screenshot.png")));
Handling Alerts, Frames, Windows
page.onDialog(dialog
-> {
dialog.accept();
});
Frames
Frame frame = page.frame("frameName");
frame.locator("#input").fill("test");
Multiple Tabs (Pages)
Page newPage = context.waitForPage(() -> {
page.click("#open");
});
Waits (Auto-Wait Advantage)
Playwright automatically
waits for:
Ø Element
visible
Ø Element
clickable
Ø Page
loaded
Explicit Wait (if needed)
page.waitForSelector("#login");
Why better than Selenium?
Ø
No flaky tests
Ø No need for Thread.sleep()
Actions (Advanced
Interactions)
page.hover("#menu");
page.dragAndDrop("#src",
"#dest");
page.dblclick("#btn");
Playwright Test Structure
(Java)
Setup Example
Playwright playwright = Playwright.create();
Browser browser = playwright.chromium().launch();
BrowserContext context = browser.newContext();
Page page = context.newPage();
Full Test Example
page.navigate("https://example.com");
page.fill("#username",
"admin");
page.fill("#password",
"123");
page.click("#login");
String text = page.textContent("#welcome");
System.out.println(text);
Parallel Execution
Playwright supports parallel execution via:
- Multiple
contexts
- Multiple
browsers
👉 Faster than Selenium
Grid setup
Reporting & Debugging
Built-in Features
Ø HTML
reports
Ø Screenshots
Ø Video
recording
Ø Tracing
Trace Example
context.tracing().start(new Tracing.StartOptions().setScreenshots(true));
Playwright with API Testing
APIRequestContext request = playwright.request().newContext();
APIResponse response = request.get("https://api.example.com");
System.out.println(response.status());
Playwright vs Selenium (Interview Favorite)
|
Feature |
Playwright |
Selenium |
|
Waits |
Auto-wait |
Manual waits |
|
Speed |
Faster |
Slower |
|
Setup |
Simple |
Complex |
|
Parallel |
Built-in |
Grid needed |
|
Stability |
High |
Flaky sometimes |
Real-Time Project Example
E-commerce login flow:
- Open
browser
- Navigate
to login page
- Enter
credentials
- Click
login
- Validate
dashboard
👉 Add:
- Screenshots
on failure
- Parallel
execution
- CI/CD integration
Playwright Framework Overview
Playwright +
TestNG / JUnit +
POM (Page Object Model)
👉 Goals:
Ø Maintainable
code
Ø Reusability
Ø Parallel
execution
Ø CI/CD
ready
Framework Architecture
project-root
├── src/test/java
│ ├──
base/
│ │
└── BaseTest.java
│ ├──
pages/
│ │
└── LoginPage.java
│ ├──
tests/
│ │
└── LoginTest.java
│ ├──
utils/
│ │
└── ConfigReader.java
│ ├──
listeners/ (optional)
│ └── factory/
│ └──
PlaywrightFactory.java
│
├── src/test/resources
│ ├──
config.properties
│ └── testdata/
│
├── pom.xml
└──
testng.xml / junit runner
Maven Dependencies
<dependencies>
<!--
Playwright -->
<dependency>
<groupId>com.microsoft.playwright</groupId>
<artifactId>playwright</artifactId>
<version>1.43.0</version>
</dependency>
<!--
TestNG -->
<dependency>
<groupId>org.testng</groupId>
<artifactId>testng</artifactId>
<version>7.8.0</version>
<scope>test</scope>
</dependency>
<!--
(Optional) JUnit -->
<dependency>
<groupId>org.junit.jupiter</groupId>
<artifactId>junit-jupiter</artifactId>
<version>5.10.0</version>
</dependency>
</dependencies>
Playwright Factory (Browser
Setup)
package factory;
import com.microsoft.playwright.*;
public class PlaywrightFactory {
Playwright playwright;
Browser browser;
BrowserContext context;
Page page;
public Page initBrowser(String
browserName) {
playwright = Playwright.create();
switch (browserName.toLowerCase()) {
case
"chrome":
browser = playwright.chromium().launch(
new BrowserType.LaunchOptions().setHeadless(false));
break;
case
"firefox":
browser = playwright.firefox().launch(
new BrowserType.LaunchOptions().setHeadless(false));
break;
default:
browser = playwright.chromium().launch();
}
context = browser.newContext();
page = context.newPage();
return page;
}
public void closeBrowser()
{
page.close();
browser.close();
playwright.close();
}
}
TestNG Version
package base;
import org.testng.annotations.*;
import com.microsoft.playwright.Page;
import factory.PlaywrightFactory;
public class BaseTest {
protected Page page;
protected PlaywrightFactory pf;
@BeforeMethod
@Parameters("browser")
public void setup(String browser) {
pf = new PlaywrightFactory();
page = pf.initBrowser(browser);
page.navigate("https://example.com");
}
@AfterMethod
public void tearDown()
{
pf.closeBrowser();
}
}
JUnit Version
@BeforeEach
void setup() {
pf = new PlaywrightFactory();
page = pf.initBrowser("chrome");
}
@AfterEach
void tearDown() {
pf.closeBrowser();
}
Page Object Model (POM)
LoginPage.java
package pages;
import com.microsoft.playwright.Page;
public class LoginPage {
private Page page;
// Locators
private String
username = "#username";
private String
password = "#password";
private String loginBtn = "#login";
// Constructor
public LoginPage(Page
page) {
this.page = page;
}
// Actions
public void enterUsername(String
user) {
page.fill(username, user);
}
public void enterPassword(String
pass) {
page.fill(password, pass);
}
public void clickLogin()
{
page.click(loginBtn);
}
public String getTitle()
{
return page.title();
}
}
Test Class
🔹 TestNG Example
package tests;
import org.testng.Assert;
import org.testng.annotations.Test;
import base.BaseTest;
import pages.LoginPage;
public class LoginTest extends BaseTest {
@Test
public void loginTest()
{
LoginPage lp = new LoginPage(page);
lp.enterUsername("admin");
lp.enterPassword("123");
lp.clickLogin();
Assert.assertTrue(lp.getTitle().contains("Dashboard"));
}
}
JUnit Example
@Test
void loginTest() {
LoginPage lp = new LoginPage(page);
lp.enterUsername("admin");
lp.enterPassword("123");
lp.clickLogin();
Assertions.assertTrue(lp.getTitle().contains("Dashboard"));
}
Parallel Execution
TestNG XML
<suite name="Suite" parallel="tests"
thread-count="3">
<test
name="ChromeTest">
<parameter
name="browser" value="chrome"/>
<classes>
<class
name="tests.LoginTest"/>
</classes>
</test>
</suite>
Reporting
Built-in
Ø TestNG
HTML reports
Ø Playwright
traces
🔹 Advanced
Ø Allure
Report
Ø ExtentReports
Utilities (Config Reader
Example)
package utils;
import java.io.FileInputStream;
import java.util.Properties;
public class ConfigReader {
Properties prop;
public ConfigReader()
{
try {
FileInputStream fis = new FileInputStream("config.properties");
prop = new
Properties();
prop.load(fis);
} catch
(Exception e) {
e.printStackTrace();
}
}
public String getUrl()
{
return prop.getProperty("url");
}
}
End-to-End Flow
Test → BaseTest → Factory → Browser → Page (POM) → Actions → Assertion → Report
Why This Framework is Strong
Ø
Separation of concerns (POM)
Ø
Scalable & maintainable
Ø
Supports parallel execution
Ø
CI/CD ready
Ø Clean reusable code
Min Interview Answer
We built a Playwright automation framework using Java with POM design pattern. Browser initialization is handled via a factory class, and BaseTest manages setup and teardown. Each page is represented as a separate class containing locators and actions. Test classes interact with page objects and use TestNG/JUnit for execution, assertions, and parallel runs. The framework supports reporting, configuration management, and can be integrated with CI/CD pipelines.